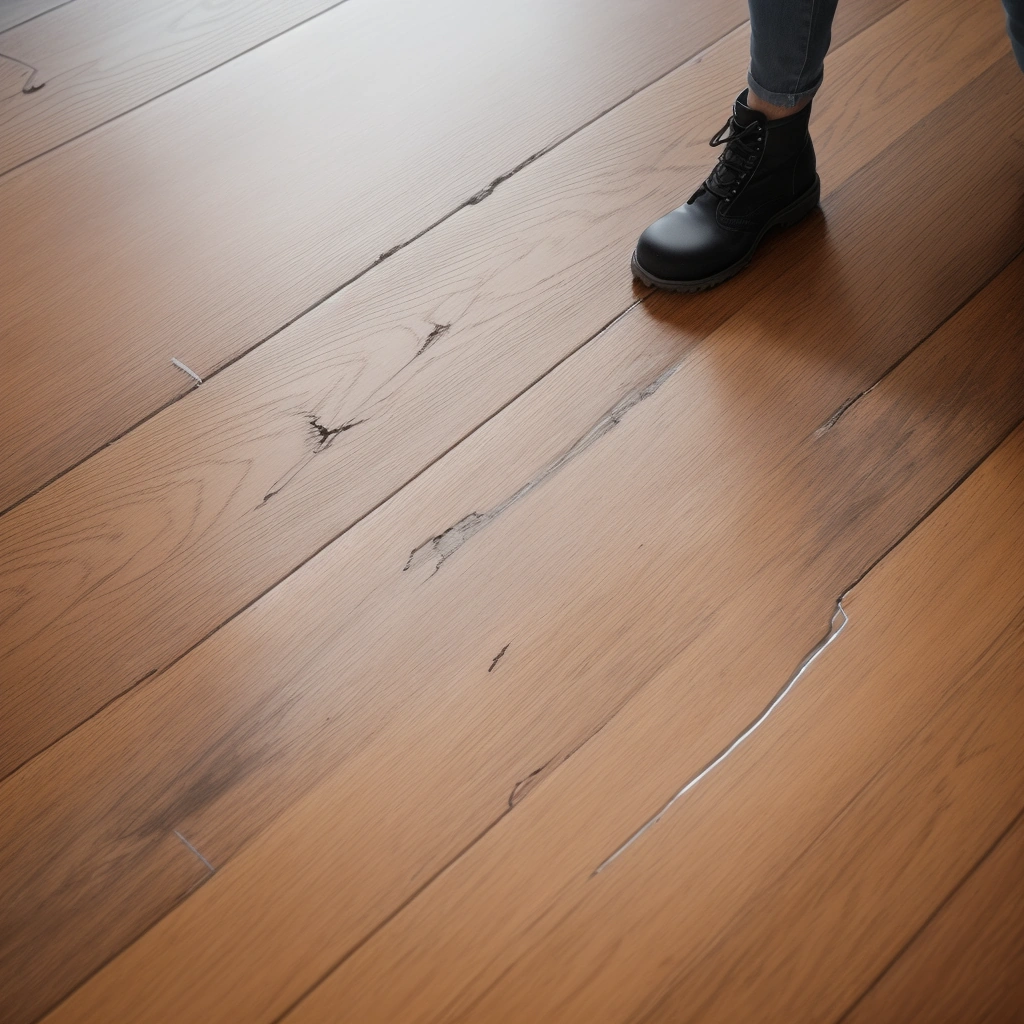
It starts subtly—thin dark lines between your floorboards that you initially dismiss as dirt or shadows. But over weeks or months, these lines darken to jet black, spreading along the seams like veins of coal through your once-pristine hardwood floors. Maybe you’ve tried vacuuming, mopping with various cleaners, even getting on your hands and knees with a toothbrush, yet the darkness persists or returns within days. If you’re seeing black lines between your floorboards, you’re witnessing a symptom that could indicate anything from harmless cosmetic issues to serious structural problems requiring immediate attention.
The black discoloration between floorboards is one of the most common yet misunderstood hardwood floor problems. What makes this issue particularly frustrating is that there are at least eight different causes, each requiring a completely different solution. Treating mold growth with wood cleaner won’t work. Addressing tannin bleeding as if it were dirt accumulation wastes time and money. This comprehensive guide will help you identify exactly what’s causing your black lines and, more importantly, how to fix them permanently.
Whether you’re dealing with 150-year-old heart pine in a historic home or modern prefinished oak installed last year, understanding why those gaps are turning black is the first step to restoring your floors’ beauty and protecting your investment. We’ll explore each potential cause in detail, provide diagnostic techniques you can perform yourself, and outline treatment options from simple DIY fixes to when professional intervention becomes necessary.
The Eight Culprits: Understanding Each Cause
1. Mold and Mildew Growth: The Silent Invader
Mold growth between floorboards is the most serious cause of black lines and requires immediate attention. This isn’t just a cosmetic issue—it’s a health hazard that can trigger allergies, respiratory problems, and in severe cases, serious illness. Mold thrives in the dark, moist environment between boards where air circulation is limited and organic material (wood) provides food.
The appearance of mold-related black lines is distinctive. They typically appear fuzzy or powdery rather than solid black, often accompanied by a musty, earthy smell that intensifies in humid weather. The discoloration may extend up the sides of boards, not just in the gap. You might notice the black lines are darker in areas near exterior walls, bathrooms, or kitchens where moisture is more prevalent. During humid periods, the black areas may appear to spread or darken.
Mold between floorboards indicates moisture infiltration from above (spills, leaks, excessive mopping), below (crawl space humidity, foundation moisture), or within (poor ventilation, high indoor humidity). The wood’s moisture content has likely exceeded 15%, creating ideal conditions for fungal growth. Left untreated, mold will continue spreading, potentially compromising the wood’s structural integrity and creating serious health risks.
Testing for mold is straightforward but important. Press clear tape onto the black area and pull it off. If black material transfers to the tape, it could be mold. For definitive identification, mold test kits from hardware stores can confirm the presence and type of mold. Professional testing might be necessary for extensive contamination or if health symptoms are present.
2. Tannin Bleeding: The Wood’s Natural Response
Tannins are natural compounds in wood that can leach out when exposed to moisture, creating dark stains that concentrate in gaps between boards. This is especially common with oak, walnut, cherry, and mahogany—woods naturally high in tannins. The black lines from tannin bleeding are typically smooth and stain-like rather than fuzzy, have no odor, and often appear after water exposure or high humidity periods.
Tannin bleeding occurs when water or cleaning products pull tannins from the wood’s cellular structure. These water-soluble compounds flow with moisture into the gaps between boards, where they concentrate and oxidize, turning black. The process is similar to how tea stains form—indeed, tea staining is actually tannin staining from the tea leaves.
This type of blackening often appears after flooding, excessive wet mopping, steam cleaning, or in homes with consistently high humidity. It’s particularly common in older homes where the original finish has worn thin, providing less protection against moisture penetration. While tannin stains are cosmetically unappealing, they don’t indicate structural damage or health hazards—the wood remains sound beneath the discoloration.
The pattern of tannin bleeding provides diagnostic clues. It typically follows the wood grain, appearing as streaks rather than uniform lines. The staining may be worse on the end grain of boards where tannin concentration is highest. After rain or humid weather, you might notice the black lines appear wet or darker, then lighten slightly as conditions dry.
3. Dirt and Debris Accumulation: The Gradual Buildup
Sometimes the simplest explanation is correct—those black lines might just be years of accumulated dirt, dust, pet hair, and debris packed into the gaps between boards. This type of blackening develops gradually, starting as grey lines that darken over time as more material compresses into the spaces. It’s most common in high-traffic areas and homes with pets or children.
The characteristics of dirt accumulation are distinct from other causes. The black material feels gritty or fibrous rather than stained into the wood. You can often see individual particles or fibers with magnification. The discoloration is usually uniform along the gap length, darker in traffic patterns, and lighter in protected areas under furniture. When you run a thin tool like a credit card edge through the gap, black debris comes out.
Modern central heating and air conditioning exacerbate this problem. As floors expand and contract with seasonal humidity changes, they create a pumping action that draws dirt deep into gaps. Static electricity from dry winter air attracts and holds fine particles. Cooking oils and cleaning product residues act as adhesives, binding dirt particles together and to the wood.
The depth of dirt accumulation can be surprising. In older homes with original floors, gaps might contain decades of compressed debris extending down 1/4 inch or more. This packed material becomes almost concrete-like in consistency, requiring significant effort to remove. The accumulation isn’t just unsightly—it prevents normal floor movement and can harbor allergens, bacteria, and insect eggs.
4. Metal Oxidation: The Chemical Reaction
Black lines caused by metal oxidation occur when iron or steel comes into contact with wood tannins and moisture, creating a chemical reaction that produces black iron tannate stains. This commonly happens with older floors fastened with iron nails, gaps filled with steel wool (a misguided old repair technique), or metal debris from renovations settling into gaps.
The staining from metal oxidation is intensely black, often with a slightly blue or purple tinge. It penetrates deep into the wood fibers, making it one of the most difficult types of staining to remove. The discoloration typically radiates from a central point (where the metal is located) and may show rust-colored edges where iron oxide (rust) is also present. These stains are permanent without chemical treatment.
This problem is particularly common in homes built before 1950 when iron cut nails were standard, or in floors where previous owners attempted repairs using inappropriate materials. Sometimes, well-meaning homeowners stuff steel wool into gaps to reduce drafts or silence squeaks, not realizing they’re creating a future staining nightmare. Even tiny metal shavings from nearby renovation work can cause significant staining if they settle into moist gaps.
Diagnosing metal oxidation staining requires careful observation. Look for nail heads that have turned black or show rust halos. Check if black lines correspond to nailing patterns. Use a magnet to detect hidden metal in gaps—steel wool or metal shavings will attract the magnet. The staining often worsens after water exposure, as moisture accelerates the chemical reaction.
5. Water Damage and Rot: The Destroyer
When black lines indicate water damage or wood rot, you’re facing a serious structural issue requiring immediate attention. This type of blackening occurs when sustained moisture exposure causes wood fibers to break down, creating soft, punky wood that appears black or very dark brown. Unlike surface staining, this represents actual wood decomposition.
Water-damaged wood between boards shows specific symptoms. The black areas feel soft or spongy when probed with a sharp tool. There’s often a distinctive musty or rotten smell. The wood may be swollen, causing boards to cup or crown. In advanced cases, you might see fruiting bodies of wood-destroying fungi—small mushroom-like growths. The blackening typically extends beyond just the gaps, affecting board edges and undersides.
Common causes include chronic plumbing leaks, ice dam damage allowing water infiltration, poor ventilation trapping moisture, groundwater wicking through foundations, or condensation from HVAC problems. The damage often starts slowly, going unnoticed until significant deterioration has occurred. By the time blackening is visible from above, the subfloor may also be compromised.
This type of damage requires professional assessment because it often extends beyond what’s visible. The structural integrity of both flooring and subfloor must be evaluated. Moisture sources must be identified and eliminated before any repair attempts. In many cases, complete replacement of affected boards and possibly subfloor sections is necessary.
6. Old Finish or Stain Migration: The Aging Process
In older floors, black lines sometimes result from the migration and concentration of old finishes or stains into gaps between boards. As floors age and move with seasonal changes, liquid components of oil-based finishes and stains can migrate into gaps where they oxidize and darken. This is especially common with floors finished with linseed oil, tung oil, or early polyurethane formulations.
This type of blackening has distinctive characteristics. The lines have a glossy or semi-glossy appearance rather than matte. They may feel sticky or tacky in warm weather. The discoloration is usually uniform along gap length and consistent throughout the room. Scraping the black material often reveals it’s a surface coating rather than wood staining. The problem is purely cosmetic and doesn’t indicate any structural issue.
The migration process accelerates with temperature fluctuations and foot traffic. As boards compress together during humid seasons, they squeeze old finish into gaps. During dry seasons when gaps open, the concentrated finish oxidizes and darkens. Years of this cycle create the black lines. Some 1960s-1970s stain formulations were particularly prone to this migration due to their high solvent content.
7. Rubber or Foam Backing Deterioration: The Hidden Culprit
If your hardwood floors previously had rubber-backed rugs, foam padding, or certain types of athletic flooring installed over them, black lines might be decomposed backing material that has migrated into gaps. As these materials age, they break down into black, tar-like substances that flow into any available space. This is particularly common under area rugs that have been in place for many years.
The appearance is distinctive—the black material is often slightly sticky or tar-like, may have a petroleum or rubber smell, and can sometimes be pulled out in stringy pieces. The staining is usually worse around the perimeter of where rugs were placed. The black material may transfer to shoes or socks when walked on. In warm weather, the material may become more liquid and spread.
This problem often goes unnoticed for years because it develops under rugs or furniture. When items are finally moved for cleaning or redecorating, homeowners discover extensive black staining in gaps. The deteriorated backing can be extremely difficult to remove because it bonds to wood fibers and penetrates deeply into gaps.
8. Insect Debris and Frass: The Pest Problem
Sometimes black lines between floorboards are accumulations of insect debris, frass (insect excrement), or the bodies of dead insects. This is particularly common with carpenter ants, termites, powder post beetles, or even just common household insects that die and decompose in floor gaps. While disturbing to consider, this cause is more common than many homeowners realize.
Insect-related black lines have specific characteristics. The material is often granular or powdery rather than solid. You might see actual insect parts mixed with the black debris. There may be small holes in the wood near black lines (beetle or termite exit holes). The accumulation might be accompanied by sawdust-like material (frass). In severe cases, you might hear insects moving within the floor structure.
This type of blackening is most common in older homes, homes with crawl spaces or basements, areas with moisture problems (which attract insects), or regions with high termite or carpenter ant activity. The black lines might be seasonal, appearing worse during insect breeding seasons. Finding this type of debris requires immediate pest inspection, as it could indicate active infestation requiring professional treatment.
Diagnostic Techniques: Identifying Your Specific Problem
The Systematic Inspection Process
Start with a thorough visual inspection in good natural light. Document patterns—are black lines throughout the house or localized? Do they follow traffic patterns or appear randomly? Are they worse near water sources or exterior walls? Take photos for comparison after treatment. Note any odors, especially musty or chemical smells.
Perform the tape test on multiple areas. Press clear packing tape firmly onto black lines and peel off. Examine what transfers: fuzzy material suggests mold, smooth staining indicates tannins or metal oxidation, granular material points to dirt or insects, and sticky residue suggests deteriorated backing or old finish.
Check moisture levels using a moisture meter at affected areas and comparing to unaffected areas. Readings above 12% indicate moisture problems. Test at different times—morning versus evening, dry weather versus humid days. High, consistent readings suggest ongoing moisture sources, while fluctuating readings might indicate seasonal humidity issues.
Physical Testing Methods
The probe test reveals structural integrity. Use an awl or thin screwdriver to gently probe black areas. Firm resistance indicates surface staining only. Easy penetration suggests water damage or rot. Granular feeling might indicate insect damage. Document findings on a floor plan for treatment planning.
The magnet test identifies metal contamination. Run a strong magnet through gaps—attraction indicates metal presence. This is especially important if considering sanding, as metal can damage sanding equipment and create more staining.
The white cloth test helps identify active mold. Dampen a white cloth with rubbing alcohol and wipe black areas. Mold will often transfer and might show green or blue tints under certain light. Tannin stains won’t transfer with alcohol. Dirt will show as brown or grey on the cloth.
Treatment Solutions for Each Cause
Treating Mold and Mildew
First, address the moisture source—repair leaks, improve ventilation, reduce humidity. Without eliminating moisture, mold will return regardless of treatment. Wear protective equipment including N95 mask, gloves, and eye protection. Mold spores are hazardous when disturbed.
For surface mold, vacuum gaps with HEPA vacuum to remove loose spores. Mix solution of 1 part bleach to 10 parts water (or use commercial mold killer). Apply to gaps using spray bottle or syringe, ensuring thorough penetration. Let sit 15 minutes, then scrub with old toothbrush. Rinse with clean water and dry thoroughly. Repeat if necessary.
For extensive mold, professional remediation may be necessary. CDC guidelines recommend professional help for mold covering more than 10 square feet. Professionals use specialized equipment like negative air machines and commercial antimicrobials. They can also assess and address hidden mold in subfloors or structural components.
After mold treatment, apply mold inhibitor to prevent recurrence. Maintain indoor humidity below 50% using dehumidifiers if necessary. Improve air circulation with fans. Consider installing moisture barriers in problem areas.
Removing Tannin Stains
Tannin stains require chemical treatment to break down the compounds. Oxalic acid (wood bleach) is most effective. Sand affected areas lightly to open wood pores. Mix oxalic acid according to manufacturer directions (typically 4-6 ounces per gallon of water). Apply liberally to stained areas, working solution into gaps.
Allow 30-60 minutes dwell time—you’ll see lightening occur. For stubborn stains, make paste with less water and leave overnight under plastic. Neutralize with baking soda solution (2 tablespoons per gallon), rinse thoroughly, and allow complete drying. Multiple applications may be necessary for deep stains.
Alternative treatments include hydrogen peroxide (30% solution, not drugstore strength) or commercial tannin stain removers. These are less aggressive than oxalic acid but may require more applications. Always test in inconspicuous areas first, as bleaching agents can lighten wood excessively.
Deep Cleaning Dirt Accumulation
Start with dry removal using a shop vacuum with crevice tool. Work systematically, spending time on each gap. Use thin tools like old credit cards, putty knives, or specialized gap cleaning tools to loosen packed debris. Compressed air can help dislodge deep material, but wear protection as debris will fly.
For stubborn accumulation, use wood floor cleaner or mild detergent solution. Apply with syringe or squeeze bottle directly into gaps. Let soak 5-10 minutes to soften debris. Scrub with gap brush or old toothbrush. Extract dirty solution with wet vacuum. Rinse with clean water and dry thoroughly.
Consider professional deep cleaning for extensive accumulation. Professional equipment includes specialized gap cleaning machines that use high pressure and vacuum simultaneously. Steam cleaning can also be effective but must be done carefully to avoid moisture damage.
Neutralizing Metal Stains
Metal stains require chemical treatment with oxalic acid or phosphoric acid. First, remove any metal pieces from gaps using needle-nose pliers or magnets. Sand affected areas to bare wood. Apply oxalic acid solution, allowing extended dwell time as metal stains penetrate deeply.
For severe staining, use phosphoric acid (naval jelly) carefully following safety protocols. This stronger acid can remove deep metal stains but requires careful neutralization and can damage surrounding finish. Multiple applications are usually necessary.
After stain removal, fill gaps where metal was removed to prevent future contamination. Use color-matched wood filler or rope caulk designed for floors. Seal treated areas thoroughly to prevent moisture from creating new metal stains.
Addressing Water Damage
Water-damaged boards typically require replacement—treatment rarely restores structural integrity. However, if damage is minimal and caught early, you might salvage boards. First, eliminate all moisture sources and ensure complete drying using fans and dehumidifiers.
For minor damage, inject epoxy consolidant into soft areas to restore hardness. This is a temporary fix and doesn’t address the cosmetic issues. Sand carefully—damaged wood may tear rather than sand smoothly. Apply wood hardener before attempting to refinish.
Professional restoration might involve removing affected boards, treating subfloor, and installing matching replacement boards. This requires expertise to maintain floor integrity and appearance. Document damage extensively for insurance claims.
Prevention Strategies: Keeping Gaps Clean and Clear
Moisture Control
Maintaining proper indoor humidity (30-50%) is crucial for preventing most black line causes. Use hygrometers to monitor levels, adjusting with humidifiers or dehumidifiers as needed. Ensure proper ventilation in bathrooms and kitchens. Fix leaks immediately—even small drips can cause significant damage over time.
Install proper vapor barriers in crawl spaces and basements. Maintain gutters and grading to direct water away from foundations. Consider installing water sensors near potential problem areas for early leak detection. Regular HVAC maintenance prevents condensation issues.
Regular Maintenance
Develop a gap cleaning routine before debris accumulates. Vacuum gaps monthly using crevice attachments. Deep clean gaps annually before they darken significantly. This prevents the packed accumulation that becomes difficult to remove.
Use appropriate cleaning products—avoid excessive water that can cause tannin bleeding or mold growth. Microfiber mops slightly dampened work better than wet mopping. Immediately clean spills, especially on older floors with worn finishes.
Protective Measures
Maintain floor finish to prevent moisture penetration and tannin bleeding. Recoat every 3-5 years or when wear becomes visible. Use doormats to reduce tracked-in dirt and moisture. Place protective pads under furniture to prevent finish wear that allows moisture penetration.
Consider filling gaps in problem areas with rope caulk or specialized gap fillers. These prevent debris accumulation while allowing normal floor movement. Choose products designed for hardwood floors that remain flexible.
When to Call Professionals
Seek professional help when black lines cover more than 30% of floor area, mold is suspected or confirmed over large areas, structural damage is evident, multiple treatments haven’t resolved the issue, or health symptoms occur (suggesting mold or chemical exposure).
Professional assessment is valuable even if you plan DIY treatment. Experts can identify subtle signs of serious problems, recommend appropriate treatments, and spot issues that might worsen without proper intervention. Many offer free consultations.
For insurance claims, professional documentation is essential. Experts can determine cause, extent of damage, and provide detailed reports insurance companies require. They understand how to present findings for maximum claim approval likelihood.
Conclusion: Restoring Your Floor’s Clean Lines
Black lines between floorboards range from simple cosmetic issues to serious structural problems. Successful treatment requires accurate diagnosis—treating the wrong cause wastes time and money while the real problem worsens. Use the diagnostic techniques in this guide to identify your specific issue before attempting treatment.
Most causes of black lines are treatable with appropriate methods and patience. Even severe staining or contamination can often be resolved without floor replacement. The key is addressing underlying causes—particularly moisture issues—to prevent recurrence.
Remember that some discoloration is normal in older floors and adds character. Perfect uniformity isn’t always achievable or even desirable in historic floors. Focus on removing unhealthy or structurally compromising contamination while accepting minor cosmetic imperfections that tell your floor’s story.
With proper diagnosis, treatment, and prevention, your hardwood floors can maintain clean, attractive gaps that allow for natural movement without unsightly black lines. Whether dealing with simple dirt accumulation or complex moisture issues, the solutions exist—success simply requires understanding your specific situation and applying the appropriate remedy.