The Crucial Role of Acclimating Hardwood Flooring
Acclimating hardwood flooring is a crucial, yet frequently overlooked, step in the installation process. It’s a fundamental practice that allows the wood to adjust to the specific environmental conditions of its new home, preventing a host of potential issues down the line. Neglecting this critical step can lead to significant problems, including warping, gapping, buckling, and cupping, ultimately compromising the beauty, functionality, and longevity of your investment. Imagine spending time and money on beautiful new hardwood floors, only to see them warp and buckle weeks later due to improper acclimation. This comprehensive guide will delve into the science behind wood acclimation, providing step-by-step instructions and expert advice to ensure a successful and problem-free installation, whether you’re a seasoned DIY enthusiast or hiring a professional. Think of wood as a natural sponge, constantly absorbing and releasing moisture. Acclimation is the process of allowing the wood flooring to reach an equilibrium moisture content (EMC) with the environment in which it will be installed. This EMC is determined by the relative humidity and temperature of the space. By allowing the wood to acclimate, you’re essentially minimizing the potential for expansion or contraction after installation, thereby preventing those unsightly gaps, buckles, and squeaks that can plague improperly installed floors. For instance, bringing hardwood flooring from a cold, dry warehouse into a warm, humid home without proper acclimation can cause rapid expansion, leading to buckling. Conversely, installing flooring from a humid environment into a dry one can result in excessive shrinkage, creating unsightly gaps. Proper acclimation mitigates these risks, ensuring your floor remains stable and beautiful for years to come. Flooring professionals often emphasize the importance of acclimation as a cornerstone of a successful installation. A common industry practice is to use moisture meters to measure both the subfloor and the flooring materials to ensure they are within acceptable moisture content ranges before beginning the installation process. This proactive approach prevents costly repairs and ensures customer satisfaction. This guide will equip you with the knowledge and practical steps to master the art of hardwood flooring acclimation, setting the stage for a flawless and long-lasting installation. Whether you’re embarking on a DIY flooring project or overseeing a professional installation, understanding the principles of acclimation is paramount to achieving the desired results and protecting your investment.
Understanding the Science of Wood and Moisture
Wood, being a hygroscopic material, continually interacts with its surrounding environment, absorbing and releasing moisture. This inherent characteristic means wood’s dimensions change in response to fluctuations in humidity. When humidity increases, wood absorbs moisture and expands; conversely, when humidity decreases, wood releases moisture and contracts. Acclimation is the process of allowing hardwood flooring to adjust to the specific humidity and temperature conditions of its final destination before installation. This preemptive measure minimizes these dimensional changes after the floor is in place, preventing potential problems. Imagine bringing home hardwood flooring from a dry warehouse and installing it immediately in a humid home. The wood, thirsty for moisture, will rapidly absorb it from the air and expand, potentially leading to buckling and warping. Acclimation mitigates this risk. Proper acclimation is essential to avoid issues like cupping (where the edges of the planks are higher than the center), crowning (where the center is higher than the edges), or gapping between planks. These issues not only detract from the floor’s aesthetic appeal but can also compromise its structural integrity. Think of each plank as a tiny sponge, constantly adjusting its moisture content to match its surroundings. By acclimating the wood, we’re essentially pre-conditioning these sponges to the environment they’ll live in, preventing dramatic size changes later. For DIY enthusiasts, understanding this process is paramount to a successful hardwood flooring installation. Skipping acclimation might seem like a time-saver, but it’s a shortcut that can lead to costly and unsightly problems down the road. Many homeowners discover the importance of acclimation the hard way, facing warped or gapped floors that require expensive repairs or even complete replacement. Consulting with a flooring professional or conducting a moisture content test using a wood moisture meter can provide valuable insights and help ensure a smooth and problem-free installation. Experts in hardwood flooring installation emphasize the importance of acclimation, noting that even minor fluctuations in moisture content can cause significant dimensional changes in the wood over time. This is particularly true for solid hardwood flooring, which is more susceptible to moisture-related issues than engineered hardwood. The acclimation period allows the wood to reach an equilibrium moisture content (EMC) that is consistent with the environment of the installation area. This EMC is the point at which the wood neither gains nor loses moisture, ensuring dimensional stability. By taking the time to properly acclimate your hardwood flooring, you’re investing in the long-term beauty and durability of your floors, preventing costly repairs and ensuring a stunning finished product. This seemingly simple step can be the difference between a floor that lasts for generations and one that needs replacing within a few years. A properly acclimated floor is less likely to experience issues like warping, buckling, and gapping, resulting in a smoother, more aesthetically pleasing surface. This is crucial for maintaining the value and beauty of your home, whether you’re planning to live there for years to come or are considering selling in the future.
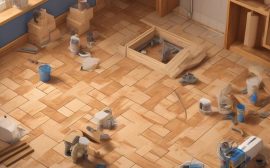
Step-by-Step Acclimation Guide
Upon delivery of your hardwood flooring, thorough inspection is crucial. Carefully examine each box for visible damage, such as dents, scratches, or broken boards. Document any issues with photographs and notify the supplier immediately to initiate replacements. A proactive approach here can save you from installation headaches down the road. Maintaining a stable environment in the installation area is paramount for proper acclimation. The ideal temperature range is between 60-80°F, mimicking typical living conditions. Equally important is controlling humidity levels within 30-50% to prevent excessive moisture absorption or drying. Using a humidifier or dehumidifier can help achieve and maintain these levels, ensuring the wood acclimates to the actual environment it will reside in. This is especially critical in regions with extreme temperature or humidity fluctuations. Proper stacking techniques are essential for effective air circulation around the wood planks. Place stickers or thin wooden strips between each layer of flooring, creating air channels. This prevents trapped moisture and allows each board to acclimate evenly. Avoid stacking directly on concrete slabs, which can introduce moisture, opting instead for pallets or raised platforms. This airflow is key to the wood gradually adjusting to its new environment, minimizing potential problems during and after installation. Acclimation time varies based on wood type and thickness. Solid hardwood typically requires 3-7 days to acclimate fully, while engineered wood, due to its layered construction, might acclimate faster, sometimes in as little as 24-48 hours. Always consult the manufacturer’s guidelines for specific recommendations. Rushing this process can negate the benefits of acclimation, leading to dimensional instability later on. A moisture meter is an invaluable tool throughout the acclimation process. Regularly measure the moisture content of both the hardwood flooring and the subfloor. The goal is for the wood flooring to reach an equilibrium moisture content (EMC) that harmonizes with the ambient humidity of the room. This equilibrium minimizes the risk of expansion or contraction after installation. For instance, in a drier climate, the wood’s moisture content should be lower, while in a more humid environment, it should be higher. Record these readings to track the acclimation progress and ensure the wood is properly adjusting. Beyond simply meeting the manufacturer’s recommended acclimation period, pay close attention to the flooring’s actual moisture content. Using a moisture meter, check the moisture content of several boards in different areas of the room. Ideally, the moisture content should be within 2-4% of the subfloor’s moisture content. This step confirms that the wood is truly acclimated and ready for installation, preventing potential issues like cupping or buckling. Don’t forget to maintain the controlled environment even after the initial acclimation period and up to 24-48 hours after installation. This allows the flooring to settle into its final position and further reduces the risk of post-installation problems. This extra precaution ensures that the floor remains stable and beautiful for years to come. Remember, patience during acclimation is key to a successful hardwood flooring installation. By taking the time to properly acclimate your flooring, you’re investing in the long-term beauty and stability of your new floor, preventing costly repairs and ensuring a stunning finish that lasts for years to come.
Mistakes to Avoid and Potential Consequences
One of the most common mistakes is rushing the acclimation process. Impatience can lead to significant problems down the road. Hardwood flooring needs time to adjust to its new environment, and failing to allow adequate acclimation time can result in dimensional changes after installation, such as cupping, crowning, or buckling. For example, imagine installing solid oak flooring in a humid climate after only two days of acclimation. The wood hasn’t had enough time to reach equilibrium with the surrounding moisture content, increasing the likelihood of warping and buckling as it continues to absorb moisture. Another critical error is neglecting to measure the subfloor’s moisture content. Excessive moisture in the subfloor can transfer to the hardwood flooring, causing it to expand and potentially buckle or cup. Using a moisture meter to assess the subfloor’s moisture content before installation is crucial. Different wood species and subfloor types have specific moisture content requirements, so always consult the manufacturer’s guidelines for acceptable ranges. Ignoring this step can void warranties and lead to costly repairs. Exposing the wood to extreme temperature fluctuations during acclimation is also detrimental. Large temperature swings can cause the wood to expand and contract rapidly, leading to stress and potential cracking. For instance, storing the hardwood flooring in a garage where temperatures fluctuate significantly between day and night can damage the wood’s cellular structure, making it more susceptible to warping or splitting after installation. Maintain a consistent temperature within the recommended range of 60-80°F throughout the acclimation period. Proper ventilation is essential for successful acclimation. Air circulation around the stacked wood allows for uniform moisture distribution and prevents trapped moisture from causing mold or mildew growth. Stacking the flooring directly on the concrete slab without proper air circulation can trap moisture beneath the wood, leading to uneven acclimation and potential issues like cupping. Ensure adequate ventilation by using stickers or pallets to elevate the flooring and allow air to circulate freely. Failing to consider the specific wood species can also lead to acclimation problems. Different wood species have varying moisture content and density, requiring different acclimation times. For instance, dense hardwoods like hickory or maple might require a longer acclimation period compared to less dense species like pine. Always refer to the manufacturer’s recommendations for the specific wood species you are installing. Improper acclimation can lead to a range of issues, including warping, buckling, and gapping between boards. These problems not only detract from the floor’s aesthetic appeal but can also create tripping hazards and structural instability. Squeaky floors can result from improper acclimation as the wood expands and contracts, rubbing against fasteners or subflooring. Perhaps most importantly, neglecting proper acclimation procedures can void manufacturer warranties, leaving you responsible for the cost of repairs. By understanding and avoiding these common mistakes, you can ensure a successful hardwood flooring installation that will last for years to come.
Conclusion: Ensuring a Beautiful, Long-Lasting Floor
Acclimating your hardwood flooring is indeed an investment, one that directly impacts both the longevity and the aesthetic appeal of your floors. By meticulously following the acclimation guidelines outlined, and truly grasping the science behind how wood interacts with moisture, you are setting the stage for a successful, problem-free installation, and mitigating many potential future flooring problems. The time spent on proper acclimation is minimal compared to the extensive and costly repairs that can arise from a rushed or neglected process. For the DIY enthusiast, this step is absolutely critical for a professional-looking outcome. For example, consider a solid hardwood floor that experiences a sudden increase in humidity post-installation; the wood will absorb moisture from the air, causing it to expand. This expansion, if not accounted for during the acclimation period, can lead to warping, buckling, and unsightly gaps between planks. Similarly, if wood is installed in an environment that is drier than its original state, it will contract, also leading to gaps and other issues.
Beyond the immediate benefits of a stable floor, proper acclimation also contributes to the long-term durability of your hardwood flooring. When wood is allowed to adjust to its environment gradually, it experiences less stress, minimizing the risk of cracks or splits over time. This is particularly important in areas with significant seasonal variations in temperature and humidity, where wood floors can undergo considerable expansion and contraction cycles. Ignoring the acclimation process can also invalidate manufacturer warranties, leaving you responsible for the cost of repairs or replacements. In many cases, the warranty requires specific steps to be taken during installation, and skipping acclimation is a common reason for warranty denial. Therefore, this is an area that should be taken very seriously, regardless of experience level with home improvement or DIY flooring.
Furthermore, the type of wood flooring you select will influence the necessary acclimation time. Solid hardwood, for instance, generally requires a longer acclimation period than engineered hardwood due to its greater thickness and natural properties. Engineered hardwood is often more dimensionally stable, and the layered construction is less prone to dramatic expansion and contraction. However, even engineered flooring benefits from acclimation, as it ensures that the wood is in equilibrium with the environment before installation. The subfloor also plays a significant role in the overall acclimation process; it is crucial to assess the subfloor’s moisture content before installing the hardwood. If the subfloor is too damp, it will introduce moisture into the hardwood, negating the effects of proper acclimation and causing similar problems as described previously. This is particularly relevant to DIY projects, where a homeowner might not be familiar with testing procedures.
To ensure a successful acclimation, remember that both temperature and humidity must be consistent in the installation area. Aim for a temperature range of 60-80°F and a humidity level of 30-50%. These conditions should be maintained for the duration of the acclimation period. When stacking the flooring, utilize stickers or pallets to allow air to circulate around all sides of the wood, and avoid stacking too high, which can impede proper airflow and prevent uniform acclimation. Always consult the manufacturer’s recommendations for specific acclimation guidelines, as these can vary depending on the wood species, milling process, and the specific environment. If you are unsure about any aspect of the acclimation process, it’s wise to consult with a professional flooring installer. They have the expertise and equipment to assess the moisture content of the wood and subfloor and can ensure that your hardwood flooring is installed properly, avoiding costly and frustrating issues down the line. With the proper care and attention to these details, your hardwood flooring will reward you with years of beauty and durability.