Advanced Hardwood Floor Design: A Comprehensive Guide
Beyond the basic plank: Transforming homes with intricate hardwood floor designs. Hardwood flooring has long been a staple of elegant interiors, prized for its warmth, durability, and timeless appeal. But beyond the standard straight-lay plank installation lies a world of design possibilities that can transform a space from simple to stunning. This comprehensive guide delves into advanced hardwood floor design strategies, exploring intricate patterns, wood species variations, and expert installation techniques to help homeowners and interior designers elevate their spaces.
The allure of hardwood flooring lies not only in its inherent beauty but also in its versatility. While a traditional installation provides a classic foundation, exploring advanced designs allows for a personalized touch that reflects individual style and enhances a home’s architectural character. Consider, for instance, how a herringbone pattern, meticulously laid in a formal dining room, can evoke a sense of timeless elegance, or how wide-plank, mixed-width flooring in a living space can create a relaxed, rustic ambiance.
These choices move beyond mere functionality, becoming integral elements of the overall interior design. One of the most impactful ways to elevate hardwood flooring is through the selection of unique patterns. Herringbone, chevron, and parquet are just a few examples of designs that can add visual interest and sophistication. A DIY project enthusiast might find the challenge of installing a parquet floor particularly rewarding, while a homeowner focused on home renovation may opt for the streamlined elegance of a chevron pattern to complement a modern aesthetic.
Understanding the nuances of each pattern and its impact on the overall space is crucial for successful home improvement. Furthermore, the choice of wood species plays a significant role in achieving the desired aesthetic. From the warm tones of cherry to the cool, contemporary feel of maple, each wood species offers a distinct character. Experimenting with mixed-width flooring, combining planks of varying widths, can add a sense of visual depth and create a more dynamic floor surface.
For example, pairing wider planks of reclaimed oak with narrower strips of walnut can result in a stunning, one-of-a-kind floor that tells a story. Floor installation is an art in itself, requiring precision and attention to detail. Whether opting for a professional installer or undertaking a DIY project, understanding the intricacies of subfloor preparation, plank alignment, and finishing techniques is paramount. A flawlessly installed hardwood floor not only enhances the beauty of a home but also adds lasting value. By carefully considering these advanced design strategies, homeowners and interior designers can unlock the full potential of hardwood flooring, creating spaces that are both visually captivating and enduring.
Pattern and Material Selection
“Herringbone, Chevron, and Parquet: A Pattern Language for Your Floor:” These classic patterns offer distinct geometric beauty and can dramatically elevate a home’s aesthetic. Herringbone, with its staggered ‘V’ shape created by short planks laid at 45-degree angles, creates dynamic movement and visual interest. This pattern works exceptionally well in both traditional and contemporary settings, adding a touch of timeless elegance. Chevron, featuring longer planks meeting at a point to form a perfect ‘V,’ exudes a sense of streamlined elegance and sophistication, often associated with high-end interiors.
Parquet, known for its intricate mosaic-like designs composed of small wood pieces arranged in geometric patterns, adds a touch of old-world charm and bespoke craftsmanship. Choosing the right pattern depends on the room’s size, style, and desired ambiance. For instance, herringbone can make a narrow space feel wider, while chevron can elongate a room. Parquet, with its intricate detail, is often best suited for larger areas where its full beauty can be appreciated. Consider consulting with a flooring expert or interior designer to determine which pattern best complements your overall design vision.
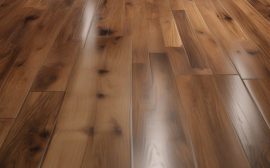
“Wood Species and Finishes: The Art of Material Selection:” From the rich tones of oak and walnut to the exotic grains of mahogany and cherry, the choice of wood species significantly impacts the final look and feel of your hardwood floor. Oak, a popular choice for its durability and versatility, offers a range of colors and grain patterns, from the warm hues of red oak to the cooler tones of white oak. Walnut, with its deep, chocolatey brown hues and distinctive grain, adds a touch of luxury and warmth.
For a more exotic look, consider mahogany or cherry, known for their rich reddish tones and unique grain patterns. When selecting a wood species, consider the hardness and durability of the wood, especially in high-traffic areas like hallways and living rooms. The Janka hardness scale provides a useful measure of wood resistance to dents and scratches. For DIY enthusiasts, understanding the specific characteristics of each wood species is crucial for successful installation and long-term satisfaction.
Finishes, from glossy to matte, further enhance the wood’s natural beauty and provide protection against wear and tear. A high-gloss finish creates a polished, reflective surface that amplifies the wood’s grain and color, while a matte finish offers a more natural, understated look. Oil-based finishes penetrate the wood, providing deep protection and enhancing its natural color, while water-based finishes offer a more durable, scratch-resistant surface with lower VOC emissions. Consider the level of maintenance required for each finish, as well as the desired aesthetic.
For homes with pets or children, a more durable finish may be preferable. In addition to traditional finishes, there are now a variety of specialty finishes available, such as wire-brushed and hand-scraped finishes, which add texture and character to the floor. Exploring these options allows homeowners and designers to create truly unique and personalized hardwood floors that reflect their individual style and the overall design of the home. Remember, the selection of wood species and finish should complement the chosen pattern and the overall interior design scheme, creating a harmonious and visually appealing space.
Beyond the traditional choices, consider exploring mixed-width installations for added visual intrigue. By combining planks of varying widths, you can introduce a dynamic, textured look that adds depth and character to the floor. This technique works particularly well with rustic or farmhouse-style interiors, but can also be adapted to more contemporary spaces. For example, combining wide planks with narrow accent strips can create a sense of rhythm and movement, while a random mix of widths can achieve a more organic, natural look.
Careful planning and execution are essential when working with mixed-width installations to ensure a balanced and visually appealing result. Consulting with a professional installer can help ensure a successful outcome. Finally, consider the role of borders and inlays in elevating your hardwood floor design. Borders can frame a room or define specific areas within a larger space, creating visual separation and adding a touch of elegance. Inlays, intricate designs created by inserting contrasting wood species or materials into the floor, can serve as focal points or add personalized touches. From simple geometric patterns to elaborate custom designs, inlays offer a unique way to express your individual style and create a truly bespoke floor. However, incorporating borders and inlays requires careful planning and precise installation, often best left to experienced professionals. These advanced design elements can transform a standard hardwood floor into a work of art, adding value and beauty to your home for years to come.
Installation Techniques and Considerations
“Subfloor Preparation and Installation: The Foundation of a Flawless Floor:” Achieving a flawless hardwood floor installation begins with meticulous subfloor preparation. This crucial first step ensures the longevity and stability of your flooring, preventing issues like squeaking, buckling, and unevenness. Before any hardwood planks are laid, the subfloor must be thoroughly inspected and addressed. Begin by checking for levelness using a long straightedge and identifying any high or low spots. Even minor deviations, as small as 1/8″ over a 6-foot span, can compromise the finished floor.
Grinding down high spots and filling low areas with a self-leveling compound are essential for creating a perfectly smooth surface. Next, assess the subfloor’s moisture content using a moisture meter. Excessive moisture can lead to warping and expansion of the wood, so ensure the subfloor meets the manufacturer’s recommended moisture levels before proceeding. Finally, inspect for any imperfections such as cracks, loose boards, or protruding nails. Repairing these imperfections will prevent them from telegraphing through the finished floor and compromising its structural integrity.
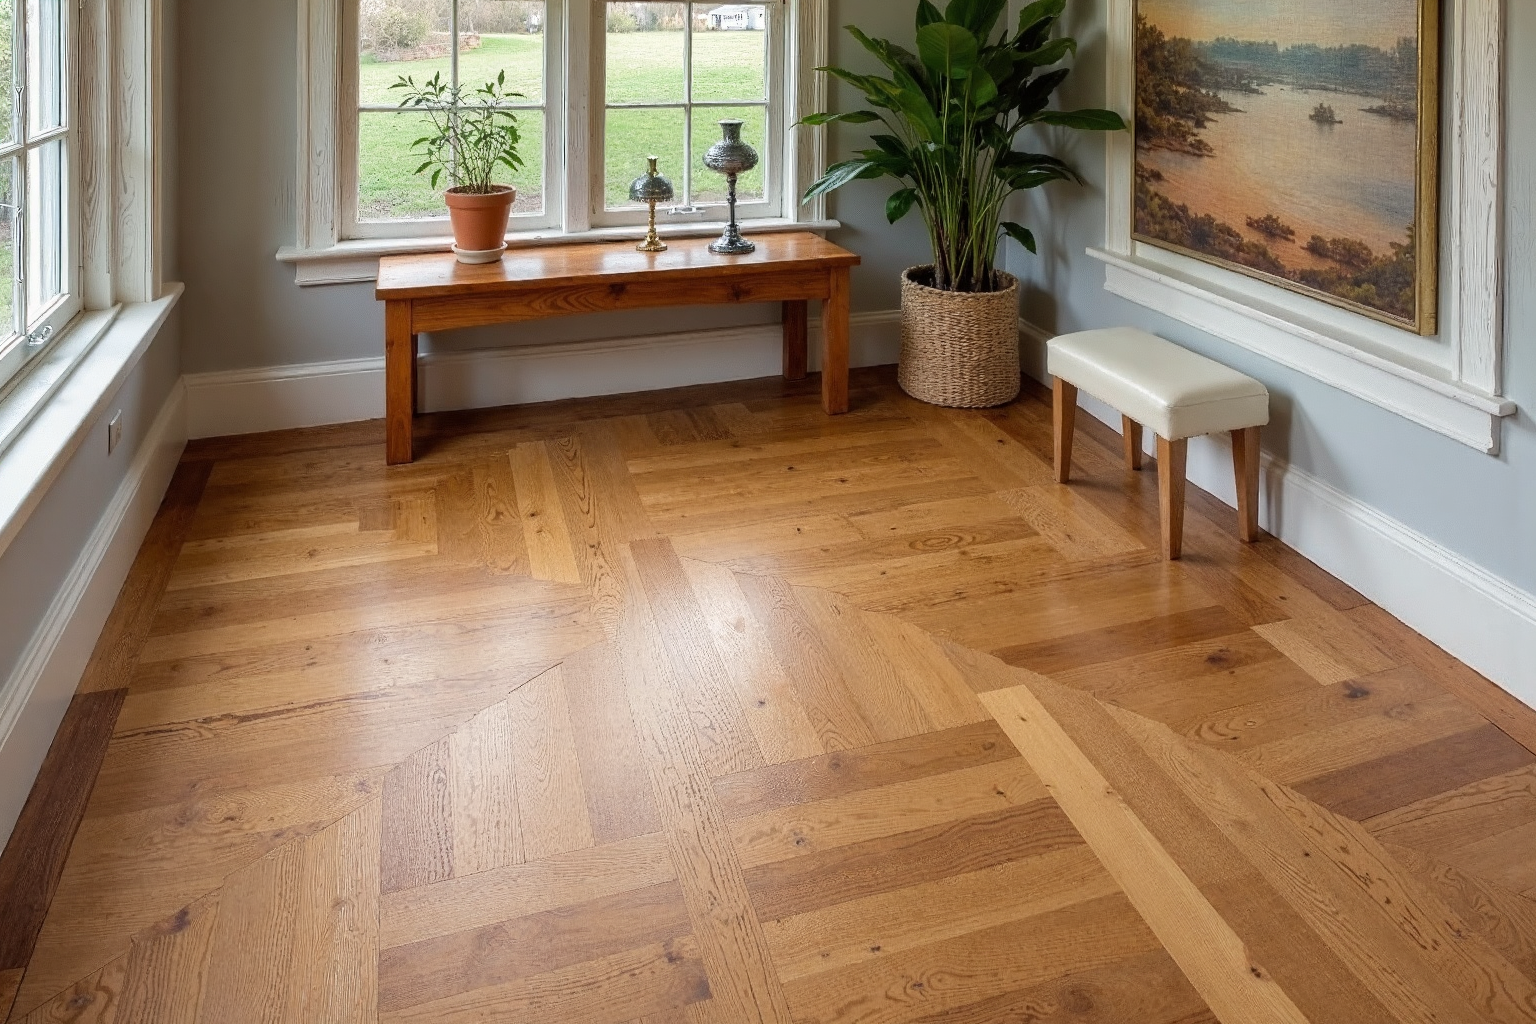
Whether you choose DIY or professional installation, this meticulous subfloor preparation is paramount. “Mixed-Width Installations: Adding Depth and Dimension:” Incorporating mixed-width hardwood planks elevates a floor from standard to visually captivating. This technique involves combining planks of varying widths, typically in a pre-determined ratio, to create a dynamic and engaging surface. The interplay of different widths adds depth, dimension, and a sense of bespoke craftsmanship. For instance, combining 4″, 6″, and 8″ wide planks of white oak can create a rustic yet refined aesthetic, while using wider planks in a chevron pattern can amplify the sense of movement and grandeur.
The selection of wood species also plays a significant role in the final look. A mixed-width installation of walnut, with its rich color variations, can create a warm and inviting atmosphere, while a similar installation using hickory can bring a touch of rustic charm. Careful planning and layout design are essential to ensure a balanced and harmonious distribution of plank widths across the entire floor. “Moisture Barriers and Underlayment: Protecting Your Investment:” Once the subfloor is properly prepared, the next crucial step is installing a moisture barrier and underlayment.
The moisture barrier, typically a polyethylene film, protects the hardwood flooring from moisture migrating up from the subfloor, especially in basements or concrete slabs. This protective layer helps prevent warping, cupping, and other moisture-related damage. Over the moisture barrier, an underlayment is installed to provide several key benefits. It acts as a cushion, reducing impact noise and enhancing the floor’s comfort underfoot. It also helps to smooth out minor subfloor imperfections and provides a more stable base for the hardwood planks.
Choosing the right underlayment is crucial and depends on the type of hardwood flooring being installed. For solid hardwood, a felt or foam underlayment is often recommended, while engineered hardwood may require a specific type of underlayment recommended by the manufacturer. Proper installation of the moisture barrier and underlayment is vital for the long-term performance and beauty of your hardwood floor. “Navigating the DIY vs. Professional Installation Decision:” While some experienced DIYers may feel comfortable tackling a hardwood floor installation, it’s essential to understand the complexities involved.
Proper installation requires specialized tools, precise measurements, and a deep understanding of wood properties and installation techniques. Factors like subfloor condition, chosen wood species, and the complexity of the pattern can significantly impact the difficulty of the installation. For intricate patterns like herringbone or parquet, professional installation is often recommended to ensure a flawless result. Professionals possess the expertise and experience to handle these complex layouts with precision and efficiency. While DIY installation can save on labor costs, mistakes can be costly and time-consuming to rectify.
Weighing the cost, complexity, and your own skill level will help you make the best decision for your project. “Acclimation: Letting the Wood Adjust:” Before installation begins, hardwood flooring must acclimate to the environment where it will be installed. This process allows the wood to adjust its moisture content to match the ambient humidity and temperature of the room. Failure to properly acclimate the wood can lead to dimensional changes after installation, resulting in gaps, buckling, or cupping. The acclimation period typically ranges from a few days to a week, depending on the wood species, the climate, and the manufacturer’s recommendations. The flooring should be stored in the room where it will be installed, in its original packaging, with adequate air circulation. This allows the wood to gradually adjust to its new environment and ensures a more stable and long-lasting installation.
Showcasing Advanced Design and Troubleshooting
Showcasing Advanced Design and Troubleshooting: Bringing Vision to Reality Achieving a truly exceptional hardwood floor goes beyond selecting a beautiful wood species and pattern. It requires careful consideration of the space, meticulous planning, and a keen eye for detail. This section explores advanced design principles through real-world case studies and offers practical troubleshooting tips to ensure a flawless, professional-grade installation. Case Study 1: Modern Minimalism Amplified with Wide-Plank Oak in a Chevron Pattern
In a contemporary loft setting, wide-plank white oak flooring laid in a chevron pattern amplifies the sense of spaciousness and architectural sophistication.
The chevron pattern, with its dynamic converging lines, draws the eye outward, creating an illusion of expanded floor area. The light, natural finish of the white oak complements the minimalist aesthetic, enhancing the airy and uncluttered ambiance. This design choice demonstrates how a classic pattern, combined with a contemporary wood species and finish, can elevate a modern interior. Case Study 2: Rustic Charm Redefined with Mixed-Width Walnut in a Herringbone Pattern
A cozy farmhouse showcases the timeless appeal of mixed-width walnut planks arranged in a herringbone pattern.
This design choice infuses warmth and character into the space, transforming it into a haven of rustic elegance. The varying widths of the planks add visual interest and texture, while the rich, dark tones of the walnut create a sense of depth and history. The herringbone pattern, known for its dynamic and engaging visual appeal, further enhances the rustic charm, creating a floor that is both beautiful and inviting. This approach exemplifies how mixed-width installations can breathe new life into traditional patterns.
Case Study 3: Parquet Perfection: Intricate Design in a Modern Setting
Parquet flooring, often associated with grand, traditional interiors, can also be a striking design element in a modern setting. In a recently renovated penthouse apartment, a custom parquet pattern featuring geometric motifs crafted from reclaimed oak adds a touch of artistry and sophistication. The warm, natural tones of the reclaimed wood complement the contemporary furnishings while adding a touch of history and character. This example demonstrates how parquet, with its intricate and customizable designs, can be adapted to suit a variety of styles and spaces, adding a layer of bespoke elegance.
Troubleshooting for a Flawless Finish: Addressing Common Installation Challenges
A successful hardwood floor installation hinges on meticulous attention to detail and proactive problem-solving. Addressing common challenges, such as uneven subfloors, moisture issues, and gaps between planks, is crucial for achieving professional-grade results. Uneven subfloors can lead to instability and squeaking, while moisture can cause warping and buckling. Gaps between planks can detract from the overall aesthetic and compromise the structural integrity of the floor. For uneven subfloors, consider self-leveling compounds or plywood underlayment.
Address moisture issues by ensuring proper subfloor sealing and acclimating the wood to the environment before installation. Minor gaps can often be filled with wood filler, while larger gaps may require professional intervention. Expert Insights for DIY Enthusiasts and Homeowners
For DIY enthusiasts, careful planning and preparation are paramount. Thoroughly research the chosen pattern and wood species, and invest in quality tools and materials. Consider renting specialized tools, such as flooring nailers and power saws, for a more efficient and professional-looking installation.
For complex patterns or challenging installations, consulting with experienced flooring professionals is highly recommended. Their expertise can help ensure a flawless and long-lasting result, preventing costly mistakes and ensuring the longevity of your investment. By understanding the nuances of pattern selection, wood species variations, and installation techniques, homeowners and designers can create truly unique and captivating spaces that reflect their personal style and enhance the overall aesthetic of their homes. Whether embracing the clean lines of chevron, the timeless appeal of herringbone, or the intricate beauty of parquet, advanced hardwood floor design offers a powerful way to elevate any interior.
Conclusion: Elevating Your Home with Hardwood Flooring
Advanced hardwood floor design offers a powerful way to elevate a home’s aesthetic, transforming it from ordinary to extraordinary. By exploring intricate patterns like herringbone, chevron, and parquet, experimenting with diverse wood species such as oak, walnut, and maple, and employing expert installation techniques, homeowners and designers can create truly unique and captivating spaces. These design choices move beyond the simple functionality of flooring and become integral to the home’s overall design narrative, adding depth, character, and lasting value.
Careful planning, meticulous execution, and attention to detail are key to achieving a stunning and long-lasting hardwood floor that enhances the beauty and value of any home. The selection of a specific wood species plays a crucial role in setting the tone and style of a room. White oak, with its subtle grain and light coloring, lends a sense of airiness and modernity, while rich walnut evokes warmth and sophistication. For DIY enthusiasts, understanding the nuances of each wood type, including its hardness and workability, is essential for a successful installation.
Resources like online tutorials and home improvement guides can provide valuable insights into selecting the right wood for your project and skill level. Considering the natural light in the room and the existing décor will further enhance the impact of your chosen wood species. Beyond the choice of wood, the pattern of the flooring significantly influences the visual appeal of the space. Herringbone, with its dynamic zig-zag arrangement, adds a touch of classic elegance, while chevron, with its more streamlined V-shape, creates a sense of modern sophistication.
Parquet, known for its intricate geometric designs, offers a more ornate and luxurious feel. For smaller rooms, a simpler pattern or wider planks can create the illusion of spaciousness, while larger rooms can accommodate more complex designs and mixed-width installations. Visualizing these patterns within the context of your home’s interior design is crucial for achieving a cohesive and harmonious look. Proper subfloor preparation is the foundation of any successful hardwood floor installation. Whether you opt for a DIY project or hire a professional, ensuring a level, dry, and clean subfloor is paramount for a flawless finish and long-term durability.
Overlooking this crucial step can lead to unevenness, squeaking, and premature wear. Investing time in proper subfloor preparation, including moisture mitigation and leveling, will ultimately save time and money in the long run. For DIY projects, detailed instructions and online resources are readily available to guide you through the process. Finally, understanding the maintenance requirements of your chosen hardwood floor is essential for preserving its beauty and longevity. Regular cleaning with appropriate products, avoiding excessive moisture, and using protective mats in high-traffic areas will help maintain the floor’s pristine condition. By considering these factors from the outset, homeowners can ensure that their investment in hardwood flooring continues to enhance their home’s aesthetic and value for years to come.