From Worn to Wonderful: Reviving Heavily Damaged Hardwood Floors
Hardwood floors, the timeless foundation of countless homes, whisper tales of generations past. Yet, time, water, pets, and everyday life can take their toll, leaving behind a landscape of scratches, stains, and irreparable damage. While a complete replacement might seem inevitable, a comprehensive hardwood floor restoration is often within reach, even for the most severely damaged floors. This guide provides a detailed, step-by-step system for professionals and experienced DIYers to breathe new life into tired hardwood, transforming them from eyesores into stunning centerpieces once again.
We’ll delve into advanced techniques, explore the latest technologies, and equip you with the knowledge to tackle even the most challenging restoration projects. Prepare to witness the remarkable transformation – from distressed to dazzling. The journey of damaged hardwood repair begins with understanding the scope of the undertaking. Many homeowners face common issues such as surface scratches from daily wear and tear, requiring only basic floor sanding and wood floor refinishing. However, deeper problems like pet stain removal or water damage repair demand more specialized attention.
Recognizing the difference is crucial; a superficial scratch can be addressed with a light sanding and a fresh coat of polyurethane, while extensive water damage might necessitate board replacement. This guide will walk you through identifying these distinctions, ensuring you employ the most effective methods for your specific situation. One of the most significant advancements in recent years is the advent of dustless sanding systems. Traditional floor sanding methods create a considerable amount of airborne dust, posing health risks and requiring extensive cleanup.
Dustless sanding, on the other hand, utilizes specialized equipment with powerful vacuum attachments to capture dust at the source, creating a cleaner and safer working environment. This technology not only benefits the user but also minimizes disruption to the rest of the home. Investing in or renting a dustless sanding system can significantly improve the overall experience of hardwood floor restoration, making it a more appealing option for DIY enthusiasts and professionals alike. Ultimately, the success of any hardwood floor restoration project hinges on a commitment to long-term hardwood floor maintenance.
Proper care and preventative measures can significantly extend the life of your newly restored floors. This includes regular cleaning with appropriate cleaning solutions, the strategic placement of rugs in high-traffic areas, and prompt attention to spills. By adopting a proactive approach to maintenance, you can preserve the beauty and integrity of your wood floors for years to come, safeguarding your investment and ensuring that they continue to enhance the aesthetic appeal of your home. Addressing issues like wood floor patching promptly also contributes significantly to longevity.
Assessing the Damage: A Diagnostic Approach
Before wielding a sander or applying a finish, a thorough assessment of the damage is crucial to successful hardwood floor restoration. Different types of damage demand different approaches. Water damage, a common culprit, often manifests as cupping (edges higher than the center) or crowning (center higher than the edges) of the boards. These distortions indicate moisture imbalances within the wood, requiring careful evaluation to determine the source and extent of the problem. Stains, particularly pet stains, can penetrate deeply into the wood fibers, necessitating specialized pet stain removal techniques and potentially affecting the long-term integrity of the floor.
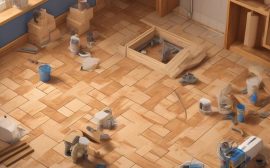
Scratches range from superficial surface abrasions that can be addressed with light floor sanding to deep gouges that necessitate more aggressive sanding or wood floor patching. Carefully inspect the entire floor, noting the extent and type of damage in each area. Documenting the location and severity of each imperfection will streamline the subsequent repair process. Use a moisture meter to assess the moisture content of the wood, especially in areas suspected of water damage. High moisture readings indicate ongoing issues that must be resolved before any refinishing work begins.
Photograph the damaged areas for reference throughout the hardwood floor restoration process; these visual records will be invaluable when selecting repair methods and tracking progress. This initial diagnostic approach will dictate the appropriate repair methods and materials needed for effective damaged hardwood repair. Consider hiring a professional inspector for an unbiased evaluation, especially if you suspect structural damage, extensive mold growth beneath the flooring, or have concerns about asbestos in older flooring adhesives. A qualified inspector can identify hidden problems and provide recommendations for safe and effective remediation. Furthermore, before undertaking any floor sanding, determine the existing floor thickness to ensure there is enough material to work with. Excessive sanding can compromise the floor’s structural integrity, making board replacement a more viable option. Understanding the limitations of your existing floor is key to a successful wood floor refinishing project and preventing further damage. This detailed assessment will inform your decisions regarding dustless sanding, board replacement, and overall hardwood floor maintenance strategy.
Repair Methods: Sanding, Patching, and Board Replacement
Once the damage is assessed, the next step is selecting the appropriate repair methods, a critical juncture in any hardwood floor restoration project. For minor scratches and surface imperfections, often superficial blemishes in the finish, sanding is frequently sufficient. This process involves abrading the existing surface to create a smooth, uniform plane ready to accept a new finish. The key to successful floor sanding lies in progressive grit refinement. Beginning with coarser grits (36-40) effectively removes the old finish and addresses deeper scratches, while subsequent passes with medium (60-80) and finer grits (80-120) refine the surface, eliminating swirl marks and preparing the wood for staining or sealing.
The choice of grit progression depends on the severity of the damage and the type of wood; softer woods may require a more gradual transition to prevent over-sanding. This meticulous approach ensures a professional-quality wood floor refinishing outcome. For more significant damaged hardwood repair, such as deep scratches, gouges, or areas where the wood is splintered, patching becomes necessary. Wood filler, a composite material designed to mimic the appearance and properties of wood, is suitable for smaller imperfections.
However, for larger areas, the integrity of the repair demands board replacement. This involves carefully removing the damaged section of flooring, often requiring specialized tools like a circular saw and chisel, and replacing it with a new board of the same species, grain pattern, and dimensions. Sourcing reclaimed wood from similar-era homes can be an excellent way to ensure a seamless match, preserving the character of the floor. Secure the new boards with a combination of wood glue, applied liberally to the joists and edges, and strategically placed finishing nails, ensuring they are flush with the surrounding floor to avoid creating a tripping hazard.
Pet stain removal and water damage repair present unique challenges in hardwood floor restoration. Pet stains, if left untreated, can deeply penetrate the wood fibers, leaving behind unsightly discoloration and lingering odors. Enzymatic cleaners, specifically formulated to break down organic matter, are the first line of defense. These cleaners work by digesting the urine crystals and neutralizing the odor at its source. In severe cases, bleaching may be required to lighten the stain, but this should be approached with caution, as bleach can also damage the wood.
Always test in an inconspicuous area first and neutralize the bleach with a vinegar solution afterward. Water damage, on the other hand, often manifests as cupping or crowning of the boards. In these situations, addressing the underlying moisture issue is paramount before any repairs are attempted. Allowing the wood to fully dry, which may take several weeks or even months, is essential to prevent future problems. Once dry, sanding can often restore a level surface, but severely warped boards may require replacement.
Throughout any hardwood floor restoration project, prioritizing safety is paramount. Dustless sanding systems, which utilize vacuum attachments to minimize airborne dust, are highly recommended not only for environmental reasons but also for the health and safety of the individuals performing the work. Wood dust is a known respiratory irritant and potential carcinogen, making proper ventilation and respiratory protection essential. Always wear a properly fitted respirator mask certified to filter out fine particulate matter. Eye protection, such as safety glasses or goggles, is crucial to prevent wood dust and debris from entering the eyes. Ear protection, in the form of earplugs or earmuffs, is also advisable, especially when using power tools like sanders and saws. Furthermore, ensure adequate ventilation in the work area by opening windows and using fans to circulate air. Adhering to these safety precautions will help minimize the risks associated with hardwood floor maintenance and repair, ensuring a safer and more enjoyable DIY experience.
Staining and Finishing: Durability and Aesthetics
After repairs are complete, the floor is ready for staining and finishing, a pivotal stage in hardwood floor restoration that marries durability with aesthetics. Choosing the right stain color is crucial for achieving the desired aesthetic, transforming the look and feel of the entire room. Test different stain colors on a sample piece of wood, preferably the same species as your floor, to see how they look with the existing lighting and decor. Consider the undertones of your furniture and walls when selecting a stain; a warm stain can complement cool tones, while a cool stain can balance warm tones.
Apply the stain evenly, following the manufacturer’s instructions meticulously. Allow the stain to dry completely before applying the finish; inadequate drying can lead to adhesion problems and an uneven final appearance. The finish provides a protective layer that enhances durability and protects against scratches, stains, and water damage, crucial for long-term hardwood floor maintenance. Polyurethane finishes are a popular choice for their durability and water resistance, making them ideal for high-traffic areas and homes with pets.
Water-based polyurethanes are lower in VOCs (volatile organic compounds) and offer a more environmentally friendly option, aligning with growing consumer demand for sustainable home improvement solutions. Oil-based polyurethanes provide a warmer tone and may offer slightly better durability, although they typically require longer drying times and have a stronger odor. Consider the sheen level of the finish; matte finishes conceal scratches better, while gloss finishes offer a more reflective surface. Apply multiple coats of finish, allowing each coat to dry completely before applying the next, typically 24-48 hours.
Lightly sand between coats with fine-grit sandpaper (220-320) to ensure a smooth, even surface, removing any imperfections or dust particles that may have settled during drying. This step, often referred to as ‘de-nibbing,’ is essential for achieving a professional-quality finish. Consider specialized finishes, such as UV-cured finishes, for increased durability and faster drying times, a popular choice for commercial applications and homeowners seeking a faster turnaround. For damaged hardwood repair involving board replacement, ensure the new boards are acclimated to the room’s humidity level before installation to prevent warping or cracking. When dealing with pet stain removal or water damage repair, proper subfloor treatment is essential to prevent recurring issues. Finally, explore the benefits of dustless sanding systems to minimize mess and improve air quality during the wood floor refinishing process.
Long-Term Maintenance: Preserving Your Investment
Restoring hardwood floors is an investment that deserves proper care and maintenance. Regular cleaning with a microfiber mop and a pH-neutral cleaner will help prevent the buildup of dirt and grime. Avoid using harsh chemicals or abrasive cleaners, as these can damage the finish. Place mats and rugs in high-traffic areas to protect the floor from scratches and wear. Use furniture pads under the legs of chairs and tables to prevent dents and scratches. Control humidity levels to prevent warping and cupping.
Aim for a relative humidity of 30-50%. Repair any water leaks promptly to prevent water damage. Consider periodic professional cleaning and wood floor refinishing to maintain the floor’s beauty and longevity. Effective hardwood floor maintenance extends beyond simple cleaning. Understanding the nuances of wood behavior in varying environmental conditions is crucial. For instance, seasonal changes in humidity can cause wood to expand and contract, potentially leading to gaps or buckling. A whole-house humidifier or dehumidifier can help maintain a stable environment, minimizing these effects.
When addressing spills, immediate action is paramount. Allowing liquids to sit, especially acidic substances like pet urine, can lead to stubborn stains that require specialized pet stain removal techniques, potentially involving enzymatic cleaners or even board replacement in severe cases. Regularly inspect your floors for signs of wear and tear, addressing issues promptly to prevent further damage. Addressing damaged hardwood repair proactively is key to preserving your floor’s integrity. Scratches, whether from pets or furniture, can often be addressed with simple touch-up kits or by buffing and applying a new coat of finish.
Deeper gouges may require wood floor patching using wood filler or epoxy, carefully matched to the floor’s color and grain. For more extensive damage, such as water damage repair necessitating board replacement, consider consulting with a professional. They can ensure proper installation and seamless integration with the existing floor. Remember that proper preparation, including thorough floor sanding, is essential for any repair or refinishing project. Dustless sanding systems are highly recommended to minimize airborne dust and create a cleaner working environment.
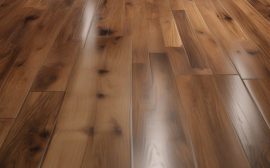
Finally, remember that even with diligent care, hardwood floor restoration may be necessary after years of use. When the time comes for a full wood floor refinishing, carefully consider your options for stain and finish. Modern finishes offer enhanced durability and resistance to scratches and water damage. Explore different sheen levels to achieve the desired aesthetic, from matte to high gloss. By investing in proper maintenance and addressing repairs promptly, you can ensure that your restored hardwood floors will remain a source of beauty and pride for generations to come. An after photo showcasing the same living room floor, now beautifully restored with a rich stain and glossy finish.