Introduction: Reviving the Beauty Beneath Your Feet
Hardwood floors, a hallmark of timeless elegance and enduring value, often bear the brunt of daily life, silently enduring the scuffs and spills of a busy household. Scratches, dents, and a faded finish, accumulated over years of use, can diminish their allure, leaving homeowners yearning for the lustrous sheen of yesteryear, a look that speaks of quality and care. Before resigning yourself to costly replacements, which can disrupt your life and strain your budget, consider the transformative power of refinishing.
Refinishing wood floors is a cost-effective DIY home improvement project that breathes new life into your home’s existing character, restoring its warmth and beauty without the expense and hassle of a complete overhaul. This is especially relevant as homeowners increasingly seek ways to maximize their existing assets and personalize their living spaces. Think of refinishing as a meticulous restoration, uncovering the inherent beauty hidden beneath years of wear and tear. This comprehensive guide provides a step-by-step approach to refinishing your hardwood floors, empowering you to achieve a showroom finish and revitalize your living space, all while saving money and gaining a sense of accomplishment.
We’ll delve into the nuances of sanding techniques, explore the art of staining and sealing, and address common pitfalls that DIY enthusiasts often encounter. Whether you’re dealing with minor surface scratches or more significant damage, this guide will equip you with the knowledge and skills necessary to tackle the project with confidence. The process of floor restoration is not merely cosmetic; it’s an investment in your home’s longevity and aesthetic appeal, enhancing its overall value and creating a more inviting atmosphere.
According to ‘The U.S. Economy: Indicators Point to Continued Growth – Hardwood Floors Magazine’, investing in home improvements like hardwood floor refinishing can significantly boost property value, aligning with the current economic trend of prioritizing home investments. Furthermore, refinishing allows you to customize the look of your floors to match your evolving style preferences. Perhaps you’re tired of the existing color and want to opt for a lighter, more modern stain. Or maybe you want to enhance the natural grain of the wood with a clear sealant. Refinishing offers a blank canvas to express your personal taste and create a flooring solution that perfectly complements your home’s décor. Consider, for example, the difference between a dark walnut stain that exudes classic elegance and a light, airy maple finish that brightens a contemporary space. The possibilities are endless, and the results can be truly transformative.
Assessing the Damage and Identifying Your Wood
Before embarking on this rewarding DIY home improvement project, a meticulous assessment of your hardwood floors is paramount. Begin by definitively identifying the wood species. Oak, maple, and hickory each possess unique grain patterns and hardness levels, influencing the sanding and staining process. Understanding your wood floors’ composition is crucial for selecting the appropriate refinishing products and techniques. Consider consulting a flooring specialist if identification proves challenging; misidentification can lead to irreversible damage during sanding.
This initial diagnosis directly informs your material selection, sanding strategy, and ultimately, the success of your floor restoration endeavor. Next, meticulously evaluate the extent of the damage. Distinguish between superficial scratches that primarily affect the finish and deeper gouges that penetrate the wood itself. Surface imperfections can often be addressed with light sanding and a fresh coat of sealant, while deeper damage may necessitate more aggressive sanding or even wood filler. Note any loose boards or squeaks; these structural issues must be resolved before refinishing to ensure a stable and uniform surface.
Addressing these concerns proactively will contribute significantly to the longevity and aesthetic appeal of your refinished hardwood floors, enhancing your home value. Finally, determine the existing finish type – is it polyurethane, varnish, or wax? This knowledge is critical because certain finishes require specific removal methods. For instance, wax finishes must be completely removed with a solvent before sanding. Engineered hardwood presents a unique challenge due to its thin veneer; excessive sanding can expose the core material, rendering the floor irreparable. Unlike solid hardwood, engineered wood floors can only withstand a limited number of sandings. Furthermore, if your home was built before the 1980s, exercise extreme caution and check for asbestos, particularly in the adhesive used to install the wood floors. If asbestos is present, professional abatement is legally required and essential for safety. Prioritizing safety and proper assessment ensures a successful and healthy home improvement experience.
Preparing the Room: A Clean Slate for Success
Preparation is paramount for a successful refinishing project. Clear the room completely, removing all furniture, rugs, and curtains. Even seemingly small items can obstruct the sanding process or become coated in dust, so a completely empty room is ideal. Cover doorways and vents with plastic sheeting, securing it with painter’s tape, to contain the inevitable dust cloud. This simple step significantly reduces post-project cleanup and prevents dust from infiltrating other areas of your home. Protect yourself with essential safety gear: safety glasses to shield your eyes from flying debris, a properly fitted respirator mask to avoid inhaling fine dust particles, and ear protection to mitigate the noise from the sanding equipment.
These precautions are non-negotiable for a safe and healthy DIY experience. Remove baseboards carefully using a pry bar and utility knife, scoring along the top edge where the baseboard meets the wall to prevent tearing the paint or drywall. Number each piece sequentially on the back with a pencil before removal; this ensures accurate and efficient reinstallation later. Store the baseboards in a safe location, away from the work area, to prevent damage. Thoroughly clean the hardwood floors with a specialized wood cleaner to remove any existing dirt, grease, wax buildup, or lingering residue from previous cleaning products.
A clean surface allows for optimal adhesion of the new stain and sealant. Countersink any exposed nails or screws using a nail set and hammer, ensuring they are flush with or slightly below the surface of the wood floors. Protruding fasteners can tear the sandpaper and damage the sanding equipment, leading to uneven sanding and a compromised finish. Consider renting a heavy-duty vacuum with a HEPA filter to further eliminate dust and debris before sanding begins.
This often-overlooked step is crucial for achieving a flawless finish and minimizing airborne particles. Address any squeaky floorboards by driving screws through the floorboards and into the joists below. This will prevent movement during the sanding process and ensure a more uniform surface. By meticulously preparing the room, you create a clean slate for the refinishing process, minimizing cleanup efforts and maximizing the potential for a smooth, even, and professional-looking finish. A well-prepared room is the foundation for a successful DIY floor restoration project, ultimately increasing your home value and providing years of enjoyment from your revitalized hardwood floors. Remember, proper sanding, staining, and sealing are all dependent on this initial preparation.
Sanding Techniques: Achieving a Smooth, Even Surface
Sanding is indeed the heart of the refinishing process, demanding patience, precision, and a keen understanding of wood behavior. Renting a drum sander is typical for expansive areas, while an edge sander meticulously tackles corners and perimeters. However, remember that these tools are powerful and unforgiving; practice in an inconspicuous area first. The initial pass with a coarse-grit sandpaper (36-40 grit) is crucial for removing the existing finish, be it polyurethane, varnish, or wax, and for leveling out any significant imperfections in your hardwood floors.
This step directly impacts the final outcome of your floor restoration, so take your time and avoid dwelling in one spot to prevent creating dips or grooves. Progressing systematically through the grits is key to achieving a showroom-worthy finish. After the initial coarse sanding, transition to a medium-grit sandpaper (60-80 grit) to refine the surface, removing the scratches left by the coarser grit. Finally, use a fine-grit sandpaper (100-120 grit) for a final, polished surface, preparing the wood floors perfectly for staining and sealing.
With each pass, overlap your sanding strokes by about 50% to prevent visible lines or ridges. Thoroughly vacuum between each grit change; even seemingly insignificant dust particles can compromise the smoothness of the subsequent sanding stages and the adhesion of the finish. This meticulous approach is a hallmark of professional refinishing. For DIY enthusiasts seeking to elevate their home improvement project, consider incorporating techniques used by professionals. After the final sanding, many experts recommend ‘water popping’ the wood – lightly dampening the floor with a clean mop to raise the grain.
This allows the stain to penetrate more deeply and evenly, resulting in a richer, more consistent color. While optional, using a random orbital sander for the final pass can significantly minimize swirl marks, particularly on softer wood species. Remember that proper sanding is paramount; it directly impacts the appearance and longevity of your refinished hardwood floors, ultimately contributing to the overall home value. Mastering these sanding techniques is essential for successful refinishing and will transform your wood floors.
Staining and Sealing: Protecting and Enhancing Your Floors
With the floor meticulously sanded to a uniform smoothness, the canvas is now prepared for the transformative steps of staining and sealing – processes that will define both the aesthetic and protective qualities of your newly refinished hardwood floors. Staining, while optional, allows you to customize the color of your wood floors, complementing your existing decor or creating a completely new ambiance. When selecting a stain, consider the undertones of your wood and the overall lighting in the room.
Sample different stains in an inconspicuous area to ensure the final result aligns with your vision. Apply the stain evenly, working in manageable sections, using a high-quality brush, foam applicator, or clean rag. Excess stain should be wiped away promptly to prevent blotchiness. Always adhere strictly to the manufacturer’s recommended drying times, as premature sealing can trap moisture and compromise the finish. Following the stain’s complete curing, the sealing process begins, a critical step in protecting your investment in floor restoration and enhancing your home value.
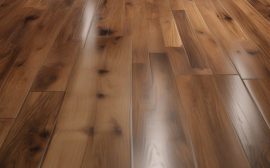
Polyurethane is a widely favored sealant for hardwood floors due to its exceptional durability and resistance to scratches, scuffs, and water damage. Within the realm of polyurethanes, you’ll find both water-based and oil-based options, each with distinct characteristics. Water-based polyurethanes are prized for their low volatile organic compound (VOC) content, making them a more environmentally conscious choice, and their rapid drying times, often allowing for multiple coats to be applied in a single day. Oil-based polyurethanes, on the other hand, offer a richer, warmer tone and tend to penetrate the wood more deeply, providing enhanced protection, but they require significantly longer drying periods and emit stronger odors during application.
Consider that, according to the National Wood Flooring Association (NWFA), proper sealing can extend the lifespan of your refinished hardwood floors by 10-15 years, making it a worthwhile investment of time and resources for any DIY home improvement enthusiast. The key to a flawless finish lies in the application of multiple thin coats of sealant, rather than a single thick coat. This technique promotes even drying, minimizes the risk of drips or runs, and enhances the overall durability of the protective layer.
After each coat has dried completely, a light sanding with fine-grit sandpaper (220-320 grit) is essential to create a smooth surface and ensure proper adhesion for the subsequent coat. This process, often referred to as ‘de-glossing,’ removes any imperfections and creates a mechanical bond between the layers of sealant. Before applying the next coat, thoroughly remove all sanding dust with a vacuum cleaner and a tack cloth. Aim for a minimum of three coats of sealant, although high-traffic areas may benefit from additional protection. Remember, patience and meticulous attention to detail are paramount when refinishing hardwood floors; rushing the process can lead to unsatisfactory results and diminish the long-term beauty and value of your home. This DIY project, when executed correctly, can yield professional-grade results, significantly enhancing your home’s appeal.
Safety Precautions: Protecting Yourself During the Process
Refinishing hardwood floors is a significant undertaking, and safety should be a top priority throughout the entire floor restoration process. Always wear certified safety glasses to protect your eyes from flying debris and sanding dust. A properly fitted respirator mask is crucial to prevent inhaling fine wood particles, which can cause respiratory irritation and long-term health problems. Ear protection, such as earplugs or earmuffs, is essential to mitigate the loud noise generated by sanding equipment, preventing potential hearing damage.
Prioritize creating a safe working environment for a successful DIY home improvement project. Adequate ventilation is paramount when sanding hardwood floors and applying finishes like staining and sealing. Open windows and doors to create cross-ventilation, and use fans to circulate air. Consider using a dust collection system attached to your sanding equipment to minimize airborne particles. Many modern floor finishes contain volatile organic compounds (VOCs) that can be harmful if inhaled. Always read and follow the manufacturer’s instructions for proper ventilation and personal protective equipment.
Dispose of sanding dust and used rags properly, as they can be flammable due to the presence of oil-based finishes. Soak rags in water and seal them in a metal container before disposal to prevent spontaneous combustion. Be especially mindful of electrical safety when using power tools for refinishing wood floors. Inspect power cords for damage before each use and avoid using extension cords whenever possible. If an extension cord is necessary, use a heavy-duty cord that is properly rated for the amperage of the tool.
Never work in damp or wet conditions, as this increases the risk of electric shock. Ensure that all power tools are properly grounded. Before beginning the sanding process, locate and mark the position of any electrical wires or plumbing pipes that may be located beneath the floor. If you are unsure about any aspect of the process, especially concerning electrical or structural safety, consult a qualified professional to ensure the safety and longevity of your refinished hardwood floors and to maximize your home value.
DIY vs. Professional: Weighing the Costs and Benefits
DIY refinishing offers significant cost savings compared to hiring professionals. The cost of renting equipment and purchasing materials typically ranges from $3 to $8 per square foot. Professional refinishing services, conversely, can range from $5 to $12 per square foot, contingent on project scope, finish type, and regional labor costs. However, DIY refinishing demands a significant investment of time, physical exertion, and a degree of technical skill. Those lacking experience with power tools or possessing limited carpentry knowledge might find the undertaking daunting, making professional engagement a more prudent, albeit costlier, avenue.
The real estate listing ‘On the market: 4-bedroom Rockford home has stainless-steel appliances, hardwood floors’ underscores the intrinsic value that well-maintained hardwood floors bring to a home, justifying either a DIY or professional refinishing investment. Beyond mere cost comparisons, the decision hinges on a homeowner’s aptitude for detail and tolerance for imperfection. While professional floor restoration services offer the assurance of expertise and specialized equipment, ensuring a flawlessly smooth surface and consistent staining, DIY refinishing allows for greater customization and control over the aesthetic outcome.
Choosing a specific stain, experimenting with different sealing techniques, and even incorporating decorative elements becomes more accessible when undertaking the project independently. However, achieving a truly professional-grade finish requires meticulous sanding, precise application of stains and sealants, and a keen eye for identifying and correcting imperfections – skills honed through experience or dedicated learning. Failing to properly prepare the wood floors can lead to uneven staining and a compromised final appearance, ultimately detracting from the home value.
Furthermore, the long-term implications of DIY versus professional refinishing extend to the durability and longevity of the wood floors. Professionals often utilize higher-grade sealants and possess the knowledge to properly prepare the surface for optimal adhesion, resulting in a finish that is more resistant to scratches, wear, and moisture damage. While DIY enthusiasts can achieve satisfactory results with readily available products, the expertise in selecting the right materials for specific wood types and traffic levels is a distinct advantage of professional services.
Investing in professional refinishing can, therefore, be viewed as a long-term investment in the preservation and enhancement of the home, potentially offsetting the higher upfront cost through reduced maintenance and extended floor life. Proper sanding is critical regardless of who does the refinishing. Ultimately, the choice between DIY and professional hardwood floors refinishing is a nuanced decision predicated on individual skill sets, budgetary constraints, and desired outcomes. For the confident and capable homeowner seeking cost savings and creative control, DIY refinishing presents a rewarding challenge. However, for those prioritizing flawless results, long-term durability, and a hassle-free experience, engaging a qualified professional remains the more strategic choice. Regardless of the chosen path, refinishing wood floors is a significant home improvement project that enhances aesthetic appeal and contributes to increased home value, breathing new life into a timeless architectural feature. Consider both time and money when making the final choice.
Troubleshooting Common Issues: Addressing Problems as They Arise
Even with careful preparation, problems can arise. Uneven sanding can result in visible ridges or swirl marks. Blotchy stain can occur if the wood is not properly prepared or if the stain is applied unevenly. Finish that bubbles or peels may indicate poor adhesion or contamination. Consult online resources or a professional for troubleshooting tips. Often, these issues can be corrected with additional sanding or reapplication of the finish. One of the most disheartening issues in a DIY hardwood floors refinishing project is the appearance of chatter marks – those wavy, repetitive imperfections left by an unsteady drum sander.
These are often a result of rushing the sanding process or using a drum sander improperly. According to Bob Vila, a veteran home improvement expert, the key to avoiding chatter marks is to maintain a consistent walking speed and overlap each sanding pass by about 50%. If chatter marks do appear, don’t panic. A more gradual approach with finer grit sandpaper, coupled with meticulous attention to detail, can usually rectify the problem. Remember, floor restoration is a marathon, not a sprint, especially when dealing with older wood floors that may have subtle undulations.
Another common challenge arises during the staining phase. Blotchy stain, where some areas of the wood absorb more stain than others, can ruin the aesthetic of your wood floors. This often occurs because of residual adhesive, inconsistent sanding, or variations in the wood’s density. To mitigate this, always ensure thorough sanding, and consider applying a wood conditioner before staining. Wood conditioners help to create a more uniform surface for stain absorption, leading to a more consistent color.
For particularly troublesome areas, a gel stain can provide more controlled coverage. Addressing inconsistencies in staining is crucial for maximizing the home value and achieving a professional-looking finish during your refinishing project. Finally, issues with the sealant, such as bubbling or peeling, are frequently linked to inadequate surface preparation or incompatible products. Before sealing, ensure the stained surface is completely dry and free of dust or contaminants. Choose a high-quality polyurethane sealant specifically designed for wood floors, and always follow the manufacturer’s instructions regarding application techniques and drying times. According to the National Wood Flooring Association (NWFA), proper adhesion is paramount for a durable finish; they recommend lightly abrading the stained surface with fine-grit sandpaper (220-grit) before applying the sealant to create a better bond. Addressing these common problems effectively will not only save you time and money but also ensure that your DIY refinishing project enhances the beauty and longevity of your hardwood floors.
Conclusion: Enjoying Your Revitalized Hardwood Floors
The culmination of your efforts in refinishing your hardwood floors is more than just a visual upgrade; it’s an investment in your home’s enduring appeal and value. By meticulously sanding, staining (if desired), and sealing, you’ve not only eradicated years of wear and tear but also unlocked the inherent beauty of the wood floors beneath. The transformation, often dramatic, serves as a testament to the power of DIY home improvement and the enduring allure of expertly restored hardwood floors.
Regular maintenance, including sweeping, vacuuming with a soft brush attachment, and occasional cleaning with a pH-neutral wood floor cleaner, becomes paramount at this stage. Beyond the immediate aesthetic gratification, consider the long-term implications of your floor restoration project. According to the National Association of Realtors, homes with well-maintained hardwood floors often command a higher selling price and experience faster sales compared to those with worn or outdated flooring. Refinishing, therefore, isn’t merely a cosmetic fix; it’s a strategic enhancement that contributes significantly to your home value.
Furthermore, the act of refinishing, rather than replacing, aligns with sustainable practices, preserving natural resources and reducing landfill waste – a conscientious choice for the environmentally aware homeowner. To ensure the longevity and luster of your newly refinished hardwood floors, consider implementing preventative measures. Area rugs in high-traffic zones, such as hallways and entryways, can act as shields against scratches and abrasions. Felt pads affixed to the legs of furniture minimize the risk of dents and gouges.
Moreover, maintaining a consistent humidity level within your home can prevent excessive expansion or contraction of the wood, mitigating the risk of warping or cracking. With diligent care and attention, your revitalized hardwood floors will continue to enhance your home’s ambiance and structural integrity for generations, serving as a lasting testament to your commitment to quality and craftsmanship. The choice of sealing products is also important. Polyurethane is a common choice, but water-based finishes are becoming increasingly popular for their lower VOC content.